Wednesday, March 27, 2013

Single Serving Deep Dish Chocolate Chip Cookie


It's a bit late at night. My kids are asleep, my husband's at work, and I'm craving chocolate chip cookies. I LOVE chocolate chip cookies. I especially love them when they're warm and fresh out of the oven with bits of melted chocolate in every ooey gooey bite. If I were to follow only what my tongue dictated, I could eat the entire tray of cookies right out of the oven.

Now to just be able to have one cookie without the temptation of its 11 or so brothers on the tray would be perfect. In comes the single serving deep dish cookie! I was most happy when I came across this recipe. In my opinion, every lady should have this recipe for those nights (like tonight) where you want chocolate chip cookies, but you don't want to go through the whole guilt trip of eating an entire dozen off the tray... not that I'm speaking from experience here.

So, to satisfy my (sinfully late at night) craving for chocolate chip cookies, here is my saviour of a cookie recipe for one (deep dish) cookie.


Single Serving Deep Dish Chocolate Chip Cookie

2 Tablespoons unsalted butter
1 Tablespoon granulated sugar
1 Tablespoon brown sugar
Drop or two of vanilla extract
Pinch of salt
1/2 teaspoon baking soda
1/4 cup flour
2 Tablespoons semisweet chocolate chips
Vanilla ice cream, for serving

Preheat oven to 375F degrees. Have one ramekin ready. 

In a medium microwavable bowl, melt the butter. Whisk in both sugars and vanilla. Whisk in salt, baking soda, and flour, Whisk in the chocolate chips. Scrape the batter into the ramekin. 

Bake 12-15 minutes or until the top is firm and light brown. Let cool for a few minutes before serving with ice cream.


As you can see, I thoroughly enjoyed this! Bon Appetit!

Ash  :)


Tuesday, March 26, 2013

For the Kids - DIY Bubble Solution


My kids love blowing bubbles. They love it so much that we go through gallons of bubble solution each summer. With winter now slowly (painfully slowly) making its exit from the northern hemisphere, bubble solution has begun popping up on store shelves, and with it the refrain "Mommy, can we get bubbles." Over the winter, I came across a recipe for homemade bubble solution. In an effort to save money, along with my ears (temper tantrums over not having a bubble store in my kitchen are no fun), I figured why not have my own bubble 'store' indeed. 

To make your own bubble solution, I can guarantee you that you already have all you need in your cupboard. If you don't, it won't cost you a fortune to get it. The bubbles come out big and beautiful. I've found that they work better if the solution has cooled completely before you use it. I've saved many of the bubble wands from previous bottles, but you can always make a few out of pipe cleaners. Just bend pipe cleaners around cookie cutters or various shapes, and wrap the extra wire around the stick portion to hold in place.You can also make some bubble blowers by lining up some straws together and wrapping around with tape. An extra 15 minutes of craft time is always a good thing.


DIY Bubble Solution

2 1/2 cups hot water
1/2 cup light corn syrup
1/2 cup liquid dish soap

Add 1/2 cup light corn syrup to the hot water and whisk well until it is dissolved. Slowly add the 1/2 cup liquid dish soap, and whisk well. Pour the bubble solution into a bottle or a container with a lid.  


Now, go outside and enjoy some good old fashioned bubble blowing with your kids. You're sure to have a blast! 


Ash :)

Thursday, February 28, 2013

Hot Bakes for Cocoa Tea


Mom: Let's go make some Bakes!
Child: Yay! What are we baking?
Mom: We're not baking anything.
Child: You just said let's go bake.
Mom: Haha! No darling, we're making bakes, not baking something.


Yes, these babies are fried, even though they are called Bakes. We also call them Float, which is probably a better name as they puff up and float to the surface once they hit the hot oil. Bakes are a very popular item among the food vendors on the island. You will find them being made at practically every festival, family gatherings, at the beach, in the market, or sometimes even randomly along the side of the road.

The basic recipe for Bakes varies from island to island. St Marteen/St Martin make a slightly saltier Johnny Cake. Trinidad and Guyana use more fat in their bake dough. Barbados has a sweeter, denser bake. Not surprisingly, I prefer the St Lucian version. These have a great balance between the sweet, and salty, and are not dense. They can be eaten plain or with butter, cheese, jam, fried chicken, or the saltfish from my Green Fig and Saltfish recipe. It's really up to you how you want to eat them. They can be used in place of bread and pair really well with practically anything. In the days of the sugar plantations, bakes with either some porridge or a piece of roasted saltfish would provide a very filling breakfast for the workers. Coupled with some cocoa tea, they were ready to face the day.

Living in Toronto, I've come to appreciate warmth and comfort provided by a couple of hot bakes combined with a steaming glass of cocoa tea. There's nothing quite like it to warm you up on a cold winter's day. 


Fried Bakes

4 cups all purpose flour
4 tsp baking powder
1/4 tsp salt
1 Tbsp granulated sugar
3 Tbsp butter (just a little less than a quarter cup)
Lukewarm water (about 1 1/2 to 1 3/4 cups)
Oil for deep frying

Add flour, baking powder, salt, sugar and cinnamon (if using) to a large bowl and mix thoroughly. Rub in butter to flour mixture.

Add enough water to make a soft dough. When the dough comes together, knead for about 6 to 8 minutes  or until dough begins to become smooth and elastic. Rub the dough with oil and let rest, covered for at least 30 minutes. 

Knead rested dough for 1 minute and then divide the dough into equal pieces and form into balls. I usually get between 16 - 18 balls.

Heat oil in a deep pan and let come up to 350 degrees F. The oil should be hot but definitely not smoking.

Take one ball of dough and place on the counter. Using the palm of your hand,  press down to flatten the dough. You should now have a rough circle. Take the flattened dough and using your thumbs and forefingers, flatten the dough a bit more until you have a slightly larger and slightly flatter circle. 

Add dough to oil - the dough should sink and within 3 seconds start floating to the top of the pan. If it doesn't then your oil is still too cold. Using a long-handled pot spoon, spoon oil over the top of the dough so that it continues to puff up, as soon as it puffs up, flip it over. You will notice that it starts to bubble and move around the pan. Let cook until the side is nicely browned.

Using a slotted spoon or tongs, remove bake from pan draining off the excess oil. Add to a paper-toweled bowl. Repeat the process from until all the bakes are made.

Can be eaten as is, or with your favourite filling. Also pairs well with cocoa tea.


Note: Use real butter as much as possible. While margarine can work in a pinch, I've found that the bakes tend to lack that special something as opposed to those made with actual butter.


Stay warm!

Ash :)


Saturday, February 23, 2013

St Lucia We Love!

St Lucia We Love (Official Video) by MONGSTAR


A wonderful music video by Mongstar released in time for independence celebrations in St. Lucia. I suggest watching it fullscreen.


Love You Better by Shayne Ross


This one was a valentine's day release from the talented Shayne Ross. His music is awesome!


Hope you enjoy the sweet sounds of St Lucia!

Ash :)

Friday, February 22, 2013

Happy Independence Day St Lucia!


The date was Thursday, February 22nd, 1979. As the clocks all over St. Lucia struck midnight, the red, white, and blue Union Jack was lowered for the last time, and the blue, yellow, black and white of St. Lucia's very own flag was raised for the very first time. Then the sweet strains of the National Anthem were heard throughout the land, celebrating the birth of our new nation.

Anyone from St Lucia will tell you this: we can travel all over the world, but there is no other place like sweet home St lucia. Our majestic Pitons, our world class Rodney Bay Marina, our historical Fort Rodney, the world's only drive-in volcano... St Lucia is a paradise. St Lucia is ingrained in us. We all must come back, be it through the trinkets found in our homes, the flags proudly displayed, the culture displayed at our gatherings, or the food.... the food... the heavenly food!

That leads me to today's post. St Lucia's national dish: Green Fig (banana) and Saltfish (salted cod). For a long time, bananas were the island's main export. This dish was one of many created in order to use the abundance of bananas on the island. So here we go:


Green Fig and Saltfish

1 hand of green bananas  
1 1/2 lb of saltfish, preferrably boneless
1 onion, chopped
2 cloves garlic, chopped
1 carrot, grated
3 medium tomatoes, chopped
1 large bell pepper, chopped
1 pinch salt
1/2 tbsp. oil
1/3 -1/2 cup water


Score each banana with a knife down the back seam. Place in a pot of water and add 1/2 tbsp of oil and a pinch of salt. Boil until the skin of the bananas change colour and the bananas are tender. This usually takes about 20 minutes.

Remove from heat. Leave the bananas in the water until ready to serve. This keeps them soft.

Boil your saltfish for about 20 minutes. Change the water, then boil again for 15 minutes more. Drain. Clean the saltfish and break it up into small pieces. If you are not using boneless saltfish, this is the time to remove the bones.

Heat the oil in a large frying pan. Sauté the onion and garlic on medium heat until translucent. Add the carrot, tomatoes, and peppers. Mix and cook for 3 minutes. Add the saltfish and stir-fry for 1 minute. Add the water and let simmer for an additional 2 minutes.

Peel the skins off the bananas and arrange them on the serving dishes. Spoon the saltfish over the green bananas.

Serve with a cucumber salad or coleslaw.


Hope you enjoy this taste of St Lucia!

Ash :)


Monday, January 3, 2011

Cocoa Tea Courage

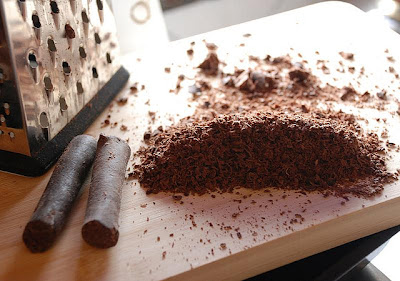
Grated Cocoa Sticks

I'm back in the cold. Yippie. I'm just sooo excited!

No really, I am....Right.

All it took was 5 days in sweet sunny St Lucia for me to come back to Toronto and be instantly depressed by the cold.

But what better time of year is there to explore the wonders of your kitchen? There's something about a hot oven, lovely scents wafting out of the kitchen, mouth-watering creations emerging to tempt your taste buds and warm your heart. Come on! While preparing to face the cold and snow, there's nothing like some fresh baked bread and some homemade hot chocolate to give you the courage you need to step outside.

In St Lucia, our version of hot chocolate is Cocoa Tea. On a cool, rainy Sunday morning, nothing hits the spot quite like a steaming mug of cocoa tea. Now cocoa tea is not actually tea. It's more like really really dark chocolate blended into milk. This wonderful concoction begins as an innocent looking cocoa pod filled with seeds, progresses to a cigar looking cocoa stick, and ends in cocoa heaven!

The process of making the cocoa stick is a long and labour intensive one. It involves cracking the ripe cocoa pods to get the seeds, cleaning, drying, then roasting the seeds, breaking them into pieces, grinding them up in a mortar and pestle, and finally shaping them into a cocoa stick! Like I said, labour intensive. But don't worry....you can just buy one at the Castries market, or you can have a St Lucian friend favour you with one brought back from St Lucia. Your life will be a lot easier for it. If you are in St Lucia one day and you do get the chance to partake in some cocoa stick production, go for it. Your cocoa tea will taste that much sweeter for it. :)

So if you happen to have a cocoa stick just lying around, use the following recipe:

St Lucian Cocoa Tea
1/2 cup grated cocoa stick (or 1/4 cup cocoa powder)
2 cups water plus a little extra
1 cup milk (homogenized, evaporated, or low-fat)
Sugar to sweeten to taste
1 tsp vanilla
1 Bay leaf
1 tsp Cinnamon
a pinch of grated nutmeg
1 tbsp cornstarch

Put water to boil with cinnamon and bay leaf. Boil for about 15 minutes. Add grated cocoa to boiling water; boil for another 10 minutes. Add milk. Sweeten to taste. Mix the cornstarch with extra water to form a sort of semi-liquid, and slowly add to the boiling mixture, stirring all the time. Add vanilla. Strain and serve.

Try topping with whipped cream to kick it up a notch. :)

Mmmmm... I think I'll go have me some right now!
 
Ash :)